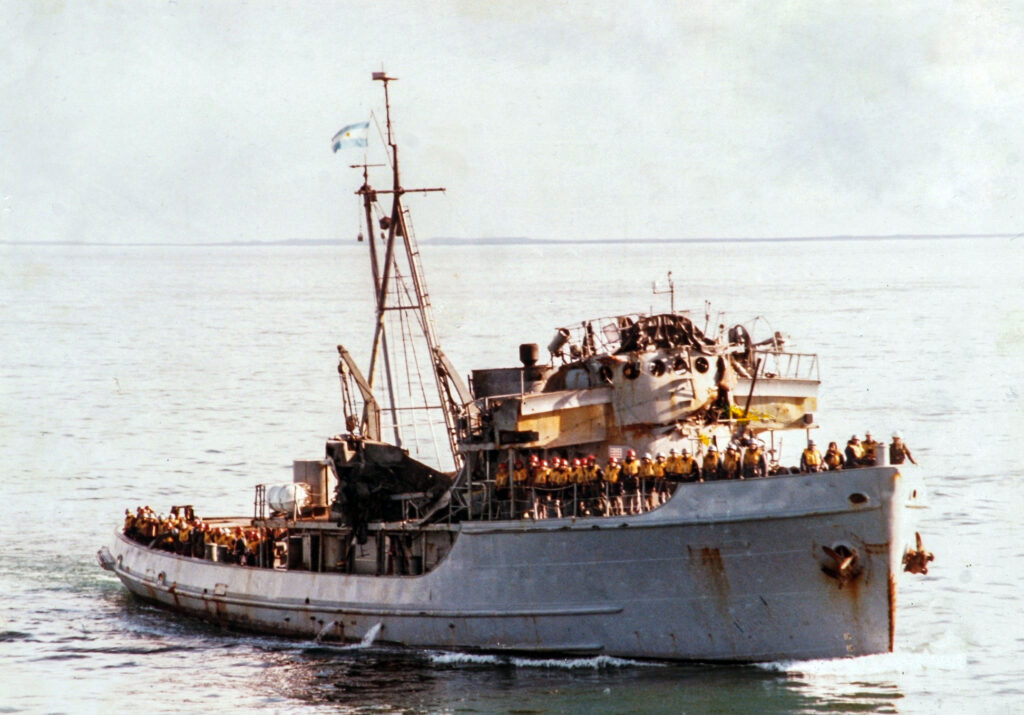
Selected as part of the Advanced Group of the Taskforce sent to retake the Falkland Islands after the Argentine invasion of 1st/2nd April 1982, Coventry sailed for Ascension Island on the 2nd. Any home going ships were paired up with South-bound ships to offload stores. Coventry paired up with HMS Aurora on the 3rd and 4th of April; 5 members of Coventry’s crew were released to return home on Aurora, and 5 members of Aurora’s crew replaced them – sadly including one young man who was to lose his life with us. Over the course of several hours, Aurora’s crew parted with just about anything of any conceivable use – including so much of their toilet roll stock that they arrived home in Plymouth with just one roll remaining.

On 3rd April, South Georgia was also invaded by Argentine forces. As Coventry proceeded South, the ship began to prepare for war, and rectified the defects that had caused 2 of her 3 Sea Dart shots in the Springtrain exercise to fail. She arrived at Ascension Island on the 11th of April. Over the next four days, a large amount of stores and spares were taken onboard via helicopter. Training for the approaching conflict continued with weapons and damage control drills.
The Argentine Navy operated a pair of Type 42 destroyers themselves, so recognition markings were added to Coventry and the other RN type 42 destroyers to help UK forces identify them. A large black stripe was painted from the waterline to the funnel amidships (primarily so that submarines could identify the ship in a hurry), and her funnel regained the slim horizontal stripe also. A large union flag was painted on the bridge roof to help with identification from the air. The ship’s pennant number (D118) was painted over. Various bright areas of paintwork (mostly white areas) were covered with grey paint, as were the ship’s boats, and the satcom radomes were given black covers. The 4.5″ gun received a coat of darker grey paint to tone down its appearance, and the black tops of the fore and main mast also went grey (the main mast would soon soot up again courtesy of the Olympus exhaust – the reason why it was painted black in peacetime!).
The civilian personnel that operated the NAAFI and laundry were given the opportunity to leave the ship before combat operations began. All refused and chose to stay with their shipmates.
On 15th April, with the bulk of the Task Force including the two aircraft carriers arriving at Ascension, Coventry was signalled to proceed South along with Brilliant, Sheffield, Glasgow, Arrow and RFA Appleleaf. This mini-Task Force was to take up a position some 1,000 miles North of the Falklands; the Argentines would hopefully continue to believe that the Royal Navy was far away at Ascension, but in reality this formidable group would be much closer to hand and ready to act if necessary.
Coventry rendezvoused with RFA Fort Austin on 16th April to swap our Lynx (XX700, ‘Lady Godiva’) for a Sea-Skua equipped example (XZ242 ‘Wee Geordie’, formerly of HMS Newcastle’s Ship’s Flight). Our Lynx helicopter crew familiarised themselves with the handling and firing of the new Sea Skua anti-ship missile, and cobbled together swivel mounts for machine guns to fire out of the cabin doors using office chair bases! When a proper mount was made available it was found to foul the Sea Skua hardware inside the cabin, so was instead attached to a bollard on the flight deck for local defence.

We stayed with RFA Fort Austin throughout the 17th April, taking on stores in one replenishment rendezvous and then rejoining for another, during which 7 Sea Dart missiles were loaded. Fort Austin had a hugely busy day, also offloading stores and munitions to HMS Arrow, Brilliant, Glasgow and Sheffield.
As we proceeded further South, the balmy tropical weather was left behind and the sea became increasingly rough. Preparation for war changed the interior of the ship as well the exterior – survival gear, life jackets and identity discs were issued; soft furnishings, pictures, trophies and ornaments were put into storage where they would not be a fire or shrapnel hazard. Some less important items were heaved overboard. Consideration was given to removing the ship’s small boats, but in the end they stayed on board.
Training continued on the journey south, concentrating on NBCD drills, naval gunfire support and using the ship’s Lynx helicopter to simulate Exocet missile attacks on the ship – whilst not using the ship’s radars, and relying only upon on listening for threats rather than actively looking. Coventry also had issues with her starboard Olympus engine (which had suspected auxiliary gear drive damage and was only to be used at action stations or in an emergency) and her auxiliary steering gear pumps (which led to manual pumping at one point).
By 28th April, the carrier battle group was now nearing our position. Electronic signal silence was abandoned and Coventry was signalled to be ready for war on midnight of the 29th. Some of the stores we missed getting hold of at Ascenscion were now made available and as a result more Sea Skua missiles and machine guns were added to the ship’s arsenal. One particularly dramatic bit of training was HMS Brilliant landing a Royal Marine assault team on Coventry’s deck in the dead of night, to practice assaulting and taking over an Argentine Type 42, if the chance should arise!
On the 1st of May, the Task Force entered the Total Exclusion Zone. Coventry took up her radar picket position to the South West of the force. Coventry’s first detection of enemy aircraft came at 18:27Z (15:27 local), when the ship’s ESM gear picked up an unidentified radar emission to the north west. This was an Argentine S-2E Tracker aircraft, searching for the Task Force, but it did not close to within missile range 1. Coventry’s radar had picked up another aircraft much earlier in the day – an RAF Avro Vulcan, on what was then the longest range bombing mission in history. It had flown from Ascenscion Island with the support numerous Victor tankers, and had bombed Port Stanley airfield shortly before the RN’s Sea Harriers (SHARs) also plastered the airfield with bombs.
A large number of Argentine attack missions were flown on this day, complete with fighter escorts, but they broadly failed to find any targets and SHAR Combat Air Patrols (CAPs) had a busy day turning away or shooting down a number of these aircraft including a British-made Canberra. The Argentines had expected an immediate landing at Port Stanley hence the major efforts they put on this day, but with no invasion force to find, it was unsurprising that most of the ships they found that day were their own. This didn’t stop one flight of A-4s attacking a cargo ship with gunfire and bombs (to no avail, as the bombs didn’t go off). The ship was the ELMA Formosa – one of their own! A flight of Daggers had the only Argentine luck of the day, finding the group of HMS Arrow, Alacrity and Glamorgan which were engaged in shelling Argentine positions near Port Stanley. Glamorgan had a near miss with two bombs going off in the water near her stern, and both Arrow and Alacrity were strafed with some minor damage resulting.
On the 2nd of May, the Tracker was back – being picked up by Coventry between 03:00Z and 03:30Z (from midnight local) 1. This was part of the effort to locate the British aircraft carriers and attack them with carrier-borne A-4 Skyhawks from the Argentine carrier, the 25 de Mayo. The Tracker crew, finally convinced they’d found the British carriers, turned around to return to their own carrier. A SHAR was scrambled from HMS Invincible and chased the Tracker, keeping its radar off to avoid counter detection, but shortly after turning on his radar and locating the Tracker ahead of him, the pilot of this SHAR found himself illuminated by the radar of a Type 42 destroyer – the ARA Hercules, an Argentine ship nearly identical to Coventry. The SHAR wisely turned around, denying the Argentines the chance to gain the first Sea Dart kill of the war. However, the Argentines were now aware that British forces had now detected one of their Type 42s, and we would know full well that their aircraft carrier would not be far away. The intended strike against the British carrier force was cancelled later in the day due to the combination of lack of wind and fear of a counterstrike from SHARs.
Very early on 3rd May, Coventry’s Lynx was airborne on a regular ECM/surveillance sortie and detected a contact on radar around 50nm east of Port Stanley 2. As the helo approached the radar contact, it lit up a searchlight and shined it at the helo whilst turning away – the very epitome of suspicious behaviour. Short on fuel, the Lynx had to return to the ship but a Sea King was tasked with further investigation. This Sea King was fired upon by what was now assumed to be an Argentine patrol boat, and turned away. In light of this, Coventry’s Lynx, now back on deck and refuelling, was armed with Sea Skua missiles and launched to attack the patrol boat.
By 03:00Z (midnight local), Coventry’s Lynx had joined up with the Sea King and verified the current location of the suspected patrol boat, and fired both her Sea Skuas from 7nm away – the first combat use of this new missile. Both missiles hit the target (destroying a launch amidships), and neither Sea King nor Lynx continued to hold a radar contact on the boat. The Lynx closed on the last known position to search for survivors in increasingly poor visibility and patchy fog, but finding nothing and now short on fuel, returned to the ship. HMS Glasgow’s Lynx was also scrambled, and on reaching the target area, was also fired at by what was assumed to be a second patrol boat – they fired their pair of Sea Skuas also. In fact, this second boat was the same contact – the Argentine rescue tug ARA Alferez Sobal, a WWII era tug. They had been despatched to search for the crew of a missing Canberra (one of the shoot downs on 1st May), but firing on the Sea King had been a very bad move indeed. The Sea Skua attack left the tug badly damaged with her bridge destroyed8 and her captain and 7 of her crew killed. In a remarkable feat of seamanship, the surviving crew repaired their damaged rudder and limped back to Puerto Deseado in Argentina, nearly 500 miles away, despite the loss of all their charts and most of their navigation kit. After the war, the tug was repaired with a new bridge and returned to service. The original heavily damaged bridge is now a museum exhibit at the Naval Museum in Tigre, Argentina, and the vessel itself was retired in 2018 and was sunk as a target in 2025 after efforts to preserve her failed due to lack of money9.
The remainder of the 3rd was fairly quiet; the task force commander had intended for the SHARs to bomb Port Stanley and Goose Green airfields again during the day, but the weather was too poor and so this was planned for the next day instead. A Vulcan raid against Port Stanley airfield late at night not only missed the runway entirely, but had dropped its bombs unarmed so that they didn’t even go off.
The 4th of May was a bad day. The carrier group had closed on the Islands to enable the SHARs to bomb the two airfields, but the weather was too poor. Initially deciding to retire to the East once more, the order was countermanded after a decision was made to loiter near the Islands and await suitable weather for the raids6.
Unbeknownst to the task force ships, Argentine Neptune aircraft had located the Type 42 destroyer screen around the carriers during the process of screening the area to see if it was safe for some C-130 supply flights to go into Stanley. The supply flights were cancelled – and a raid was planned to try and hit one of the carriers, or at the very least, take out one of the screening destroyers.
Coventry’s 965 radar had been troublesome and a vital component burned out, requiring replacement. The ship moved away from the forward south-west sector of the screen protecting the carriers, and took up a position closer to the carriers, albeit also closer to the Falklands, in order to repair the radar. HMS Sheffield took up the Coventry’s former position, with HMS Glasgow further to the west. Repairs to the radar began.
The sea was largely calm (albeit with a 2 metre swell) and the sky was overcast at around 1000 ft. Around 13:57Z (10:57 local) Glasgow and Coventry picked up brief radar sweeps from ‘Condor’ radars on incoming aircraft – indications of an attack from Exocet-carrying Super Etendard aircraft. Sheffield did not, as her ESM gear was blanked by her satcom system being used for a transmission. A minute later, Glasgow picked up a couple of radar contacts and reported the potential raid to the anti-air controllers onboard HMS Invincible and a Sea Harrier combat air patrol (CAP) was tasked to search the area.

The indications of a raid were judged by the controllers on HMS Invincible to be spurious, and the Sea Harrier CAP (up at 7000 ft altitude) could see nothing visually because of the cloud cover – and picked up nothing on radar (their Blue Fox radar sets were really pretty ineffective at this ‘look down’ search mode).
The raid in question was indeed a pair of Argentine Super Etendards – flying below 100ft, carrying out precisely the attack profile you needed to attack a Type 42 destroyer – as practiced against their own pair of such ships. In previous days, two previous suspected raids like this had both been assessed as being Mirages, which had not continued towards the task force – and could not carry Exocets.
Coventry and Glasgow ignored Invincible’s declaration of a false alarm and believed the evidence of their own systems; both fired chaff rockets to create false radar targets and confuse any incoming missile. Belatedly, Invincible agreed and ordered Sheffield to cover Glasgow’s ‘bogies’. The aircraft were now 24 miles away. Sea Dart was never a particularly fast reacting system, but the process of trying to engage the raid began, and her 909 radars searched for the incoming jets.
At 14:04Z (11:04 local), the Super Etendards, judging themselves to now be within range of the formation of ships they had been directed towards by recce aircraft earlier in the day, split away from each other and popped up just below the cloud base, saw several targets on their radars – and a ship on the horizon – and released a missile each before turning and descending to escape. Onboard Sheffield, the two tracks of the aircraft were seen to split at around 12 miles distance, but still no lock could be made, and as with previous days, it looked like this was going to be an abortive Mirage raid. No chaff was fired.
An officer on Sheffield’s bridge now sighted ‘aircraft trailing smoke’ – the incoming missile itself. Sheffield now finally turned off her satcom and picked up the radar emissions from an Exocet missile seeker head, but it was far too late to do anything about it. Sheffield was hit amidships on her starboard side 6 seconds later. The second missile appears to have missed, ditching in the sea off Sheffield’s port side. Fired at just 7 or 8 miles distance, the missile that hit the ship carried its explosive warhead and a load of unburnt rocket fuel deep into the centre of the ship. A fierce fire took hold within minutes and smoke spread throughout the ship.
After the hit, at 14:09Z (11:09 local), further contacts were detected by Invincible and Air Raid Warning Red was finally declared. Still, the Sea Harriers could find nothing. Sheffield’s crew fought the blaze for several hours, finally being ordered to abandon ship when it appeared that the flames would soon reach the Sea Dart missile magazine. 20 sailors were dead, and 24 injured. There was silence onboard Coventry for many hours – the Type 42 community was a small one, and many had friends onboard Sheffield. In the mean time, Coventry’s radar repair was completed – using cannibalised parts from the failed component, the less than satisfactory spare and a toaster from the galley.
5th May was a quiet day, with weather conditions causing anamalous radar reception, leading to much angst among radar operators on both sides – the air picture was a confused one and many contacts were soon assessed to be false echoes or weather related. The carrier group had retired further East and Coventry had taken up the south-west picket position once more – Sheffield’s former position. Of Sheffield herself, her hulk, still burning, had been abandoned mid-way between the carrier group and East Falkland.
6th May was much the same, with radar conditions proving challenging once more. Coventry was on patrol south of East Falkland, in contact with a pair of Sea Harriers when a suspicious surface contact was detected. One of the pair of aircraft descended through the cloud base to investigate, and another SHAR from a different pair also went to take a look. Neither were heard from again, with a collision in poor visibility feared. Postwar, the surface contact was judged to have been the still-floating hulk of HMS Sheffield (which continued burning for several days).
Coventry formed up with HMS Broadsword in the early hours of 9th May and closed on Port Stanley to attempt to bombard shore positions, primarily Port Stanley airfield in an attempt to prevent transport aircraft arrivals. Coventry cut the task short due to multiple problems with her main 4.5″ gun, having fired only a handful of rounds.

This combination of a Type 42 destroyer and Type 22 frigate was known as the ‘Type 64 combo’ and was intended to allow the Type 22 to act as ‘goalkeeper’ with its short range Sea Wolf missiles, protecting the Type 42 which could only engage targets at medium to long range and was thus vulnerable to short range attack. It was a tactic that was well known and had been practiced somewhat before the conflict, but it had its limitations and Broadsword’s captain had previously stated that he hoped it would never have to be used ‘for real’ 3.
Staying in the region of Port Stanley after shelling ground targets overnight was the plan for the day. This was a deliberate provocation to try and lure out Argentine aircraft against the two ships. Coventry, as well as having her Broadsword goalkeeper, was also acting as CAP controller. This provocation certainly worked because the Argentines would lay on a raid specifically targeted at the two ships after sending Learjet recce missions their way first.
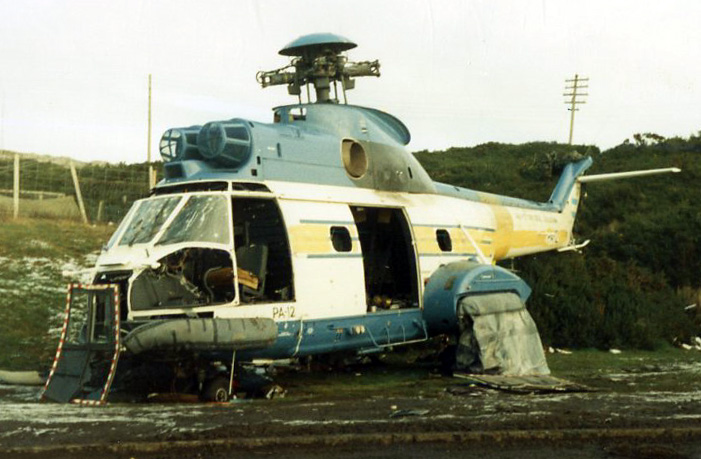
After some efforts to fix her uncooperative 4.5″ gun, Coventry had another go at gun bombardment of Argentine forces during the morning, from around 13:20Z to 13:43Z (10:20 local to 10:43 local). After the war it was found that Argentine Coastguard Puma PA-12 had been damaged by shrapnel during this bombardment and force landed, to be stripped for spares, abandoned and never repaired1. The wreck of this helicopter would end up being transported back to the UK and eventually rebuilt, entering service with the RAF as ZE449 and going on to serve in Iraq before being badly damaged in 2009, ending her second career.
Meanwhile, the incoming pair of Sea Harriers acting as CAP settled down to orbit the area – and soon spotted a suspicious radar contact on the surface to the south east of Coventry and Broadsword. Radioing it in to the fighter controller on Coventry, the SHARs were ordered to descend below the cloud base and investigate.

The SHARs identified the contact – it was the Argentine spy ship Narwal. This was a fishing trawler commandeered by Argentine naval intelligence, and the Argentines had disgracefully kept the fishermen on board to crew her – among them old men in their seventies. Coventry gave the order to attack the vessel, and the SHARs attacked with 1,000lb bombs and cannon fire. Dead in the water with a single crewman unfortunately killed after a second attack by SHARs, she was then boarded by the SBS who captured cipher equipment and code books as well as taking the crew prisoner. She sank under tow the next day.
Meanwhile, around the same time as the SHARs had picked up the Narwal, four A-4 Skyhawks – callsign Trueno from Grupo 4 – had lifted off from San Julian in Argentina, enroute to attack Coventry and Broadsword, but two of them encountered problems during air-to-air refuelling from a C-130 Hercules tanker and returned to base. The remaining pair braved what had now become a very low cloud base, poor visibility and inconsistent radar reports from the Argentine operators at Stanley to try and approach the last reported position of the two ships and attack them.

Coventry first picked up distant contacts around 14:01Z (11:01 local) approaching from the South West, at 170nm range 3. This pair of high speed targets turned around over the SW tip of East Falkland when around 70 nm from the ship, possibly spooked by the presence of the SHAR CAP. At 14:09Z (11:09 local) a further pair of targets were picked up over West Falkland, coming in rather slower than the previous pair. These were assessed as a C-130 Hercules transport on a supply run escorted by a fighter or fighters. As the targets approached to within 60 miles, Coventry prepared to fire. At the extreme edge of Sea Dart range – 38 miles – the computer indicated the engagement was feasible and the first missile was fired (the first operational use of Sea Dart), and passed through the ‘range gate’ of the 909 radar lock, indicating it had arrived at where the target was, but was assessed to have missed – later suspected to be a fuze malfunction. A second missile had followed in quick succession, as target range had reduced to 35 miles, but this was also assessed to be a miss, with the 909 tracker radar failing to track the missile, and Broadsword reporting that it didn’t seem to be travelling in entirely the right direction. A third missile was then launched, also apparently failing to track correctly. The first contact, the suspected C-130, had turned away towards Pebble Island and descended after the first near miss – contact was lost as it passed Pebble Island. The suspected fighter escort target evaded violently, quickly descending to the South of Falkland Sound before disappearing from radar.
Soon after, a third group of targets was detected on their way to the islands, also assessed to be a C-130 with escorts – another suspected supply flight. This third flight, however, turned back as it passed the northerly escaping aircraft from the second raid and was not fired upon.
So what actually happened? Certainly none of the targets fired at were a C-130, as any radar indications from a C-130 were either from the refuelling tanker (which did not come that close) or a Learjet recce aircraft (sometimes used to lead Daggers, but not usually A-4s, a good distance towards their targets due to the Dagger’s lack of decent navigation equipment). As to the two A-4s of the original four that launched intent on sinking the two ships, they did not return home. The Argentines later reported the loss of the two A-4s on this day (C-303 and C-313 flown by Lt Jorge Farias and Lt Jorge Casco). After the war, the wreckage of C-313, the body of pilot Lt Jorge Casco and his 1,000lb bomb were all found on South Jason Island (55 miles due west of Pebble Island) by HMS Hecate’s Wasp helicopter, the indications being that the A-4 had flown into a ridge line before impacting a cliff on the north west face of the island whilst travelling WSW, i.e. back towards Argentina. Just a few meters left or right and he’d have missed the island entirely.

It seems likely that this pair of A-4s were indeed fired on by Coventry, and turned away, aborting their mission, but it remains a mystery as to precisely what happened in this engagement. Of the two contacts, the one that descended to the west and was lost from radar north of Pebble Island, if you continue its track westward, would match up with C-313’s eventual crash site location. Possibly the aircraft was damaged, but it seems more likely that Lt Casco simply ran out of luck flying home at low altitude in poor visibility, and flew into the island without ever realising it was there. It is odd that he still had his bomb – potentially damage from a Sea Dart near miss had rendered the release mechanism inoperative, or he had calculated he had sufficient fuel to make it home with it still on board?
As to his wingman, probably the contact that descended to the south of Falkland Sound, perhaps his aircraft was damaged by a Sea Dart, perhaps not – but Lt Farias and C-303 were never found and it is likely we will never know for sure.
Argentine sources record a pair of Learjets from their ‘Phoenix’ squadron on a recce mission as the targets for the Sea Dart launches on this day – the timing and location (above Teal Inlet) match for the first pair of missiles, but the third Learjet to report a near miss from a Sea Dart claimed it was well East of Port Stanley, which simply does not add up.
Later, at 16:40Z (13:40 local) another flight was picked up north of Port Stanley at low level, and Coventry directed the SHAR CAP to deal with it – this contact was lost but reappeared over West Falkland later, being assessed as a supply drop aircraft. A similar flight was detected at 18:40Z (15:40 local) but again Coventry directed the CAP to this flight, with similar lack of result.
At 18:50Z (15:50 local), with Coventry now about to try shore bombardment again, Broadsword passed contact information on a target moving low and slow across East Falkland (Broadsword’s radar had far superior moving target indication against ground clutter); Coventry’s 909s struggled to lock onto the target, repeatedly losing lock amongst the ground clutter. Eventually, at 19:02Z (16:02 local), the target cleared the land background and once it was over water with a solid 909 lock, Coventry fired another Sea Dart 3.
The target was an SA.330L Puma AE-505 of Combat Aviation Battalion 601 over Choiseul sound, 13 nautical miles away from the ship, and the Sea Dart flew straight and true this time. The Puma had been tasked with finding the Narwal after the trawler had made a distress call during the SHAR attack 7. This was the first confirmed successful engagement by the Sea Dart system, as the impact and explosion were clearly visible, though no trace of the Puma’s wreckage or the three crew appear to have ever been found despite some reports of Puma wreckage being found on Lively Island after the war. Confidence in the Sea Dart system increased. Half an hour later another slow moving target was detected near Port Stanley, but this one turned to the North and permission to fire against it was denied by the Task Force Commander.
10th May was a day of poor weather as a low pressure system moved in, initially bringing rain and drizzle over the Falklands, with patchy fog at sea, which at least meant next to no air activity. The sea state got rougher, and sadly HMS Sheffield, by now no longer on fire and under tow from HMS Yarmouth, started shipping water and despite Yarmouth’s best efforts, began to list as she became ever more unstable. The tow eventually had to be released and she sank shortly afterwards, just before dawn. Meanwhile, Coventry and Broadsword returned to picket duties with the carrier group. HMS Glasgow took our place on the Stanley gunline, with HMS Brilliant as her goalkeeper. Broadsword had left us to refuel; we did the same and also took on more ammunition from the RFA stores ships. Each ship was using 5-7% of her fuel stocks per day so regular refuelling was always sensible. We rejoined Broadsword around 21:00Z (18:00 local, around 40 minutes after sunset). Hermes moved a little closer to the Islands in order to fly off an SAS recce team bound for Pebble Island, in preparation for a raid on the airfield there, but the weather was too poor and Hermes soon returned to safer waters.
On the 11th of May, the weather continued to worsen with wind speed picking up and the sea state getting much rougher. Between picket duties, shore bombardment and constant calls to action stations, the crew was getting tired. By 15:00Z (12:00 local) both ships were being rocked by a severe gale, which persisted into the night. Broadsword suffered damage to her Sea Wolf launcher and forward tracker radar during the worst of the storm. By the end of the day she had to turn to put the wind on the stern to enable the maintainers to try and rectify the damage, but in the end it would not be until the 16th that the system was proved to be fixed and back in action. Meanwhile, Hermes tried once again to get a helicopter with an SAS team closer to the Islands, this time with success, and the team in question began several days of hard work getting themselves close enough to Pebble Island airstrip to ascertain what the defences were like and what aircraft – if any – were there to be destroyed.

On 12th May, Coventry’s luck held once again as our replacement on the gunline, Glasgow, came under sustained attack. She was in company with HMS Brilliant – a Type 22 for another ‘Type 64’ combination, and had been making a nuisance of herself by shelling Argentine forces. Two raids were planned against the ships, and the first, consisting of four A-4 Skyhawks each carrying a 1,000lb bomb, was nearly wiped out. Whilst Glasgow’s Sea Dart had malfunctioned at a critical moment, Brilliant’s Sea Wolf worked flawlessly, with 3 missiles fired in quick succession, hitting the first pair of A-4s and causing the third to crash into the sea while trying to evade the missile. The fourth A-4 released his bomb at the wrong moment and it skipped off the sea and over Glasgow, missing her entirely. The second raid, another four A-4s, had more luck. Glasgow’s Sea Dart was still out of action, and this time Brilliant’s Sea Wolf joined in with a sulk at a critical moment. The Sea Wolf tracking radar lock held on the attacking aircraft was lost as the aircraft came closer – and the single target became two – then four. Lock was lost, with no time to regain it. This resulted in all four aircraft releasing their bombs – three at Glasgow and one at Brilliant. This latter bomb again hit the sea and bounced clean over Brilliant. Two of the bombs aimed at Glasgow missed. The third did not.

This last bomb entered the ship’s starboard side about 2ft above the water line just in front of the aft engine room, narrowly missed the starboard shaft, tore through the starboard Tyne intake and across the engine room, demolished the port Tyne intake and a ready use diesel fuel tank and exited just above the water line on the port side. The engine room was soon flooded with a mixture of fuel and seawater spraying in from waves washing against both holes and only heroic efforts from her ships’ company succeeded in patching the holes (initially including the use of mattresses!) and regaining manual control of the engines after many of the control cables had been severed. On the upper deck, some over enthusiastic small arms shooting by crew members had damaged Glasgow’s primary 965 radar, and this and the ongoing Sea Dart fault effectively took her out of action as an air defence asset. Happily, nobody was killed – so Glasgow’s crew have celebrated their ‘Lucky To Be Alive Day’ annually ever since. Glasgow would continue to play some part in activities, including gunfire support, but she could no longer provide any effective air defence. She would be sent home in a fortnight for in-depth repairs, losing her port Olympus engine on the way – possibly as a result of undetected shaft damage from the bomb hit. Meanwhile, the pilot of the aircraft that released the bomb had the misfortune to be shot down and killed on his way home – by troops from his own side in the vicinity of the airfield at Goose Green.
With both Sheffield and Glasgow gone or badly degraded, Coventry had become the only Type 42 left able to defend the carrier group. The next week was to be a tense one. The 13th, happily, was a relatively quiet day with wind speeds dropping and fog returning to keep the skies clear of attackers.
On 14th May, Coventry’s Lynx picked up the captain from HMS Broadsword to take him to HMS Hermes for a briefing. The result of that was that later that day Coventry was on picket duty protecting HMS Invincible whilst HMS Broadsword and HMS Glamorgan escorted HMS Hermes on a dash westward to get closer to the Falklands and let loose an SAS raiding a party tasked with destroying the Argentine aircraft at the airstrip on Pebble Island. This mission was a success, with Glamorgan and Hermes returning safely to the carrier group position east of the Islands and the airstrip having undergone a most effective transition to scrapyard courtesy of the SAS troops and Glamorgan’s 4.5″ shells.
Three days later, on the 17th of May, it was Coventry’s turn to escort a carrier on a dash to the west – this time, HMS Invincible. The tasking here was to get the carrier to a point far enough west that a single heavily fuelled Sea King carrying an 8-man SAS team could reach the Argentine mainland. Their job was to lay low near the airfield at Rio Grande from which the Argentine Super Etendards were operating from, and gather intelligence on the feasibility of assaulting the airfield to kill the pilots and destroy the aircraft. The mission did not go well – the Sea King was detected on its approach, fog shrouded the dropoff point, so they ended up flying onward to Chile. There the helo was ditched and set on fire with the crew then surrendering themselves to Chilean authorities whilst the SAS team proceeded on foot back towards Argentina. They eventually aborted the mission and were quietly extracted from Chile.
The days leading up to Operation Sutton – the amphibious landing to retake the Falklands – saw Coventry kept back from her previous gunline duties, as risking the only fully operational Sea Dart destroyer left would clearly be foolhardy. HMS Glamorgan took up the gunline, and her older twin 4.5″ gun proved a lot more reliable than Coventry’s single barrel.
Happily, on 20th May, two more Type 42s arrived in the TEZ – HMS Exeter and HMS Cardiff. Meanwhile, the Amphibious Task Group and Landing Force had arrived and during the night of 20th/21st May they entered Falkland Sound and made their way to San Carlos Water (or ‘Bomb Alley’ as it was to become known) where the landings were to begin. The confined area of San Carlos was clearly no place to put any of the Type 42s, limited as their radars were by operating so close to land, so Broadsword led the group whilst Coventry was kept back to act as radar picket for the carrier group.

The Navy primarily relied upon Leander and Type 21 frigates to defend the immediate area of the San Carlos landings, though they were fitted with ancient and largely ineffective Sea Cat missiles. One of the Type 21s, HMS Ardent, was bombed repeatedly by A-4s through the day of the 21st, eventually having to be abandoned as a major fire took hold of the crippled ship. HMS Antrim took a bomb to her stern, tearing through her Sea Slug missile corridor and lodging within the ship, having failed to explode. HMS Argonaut was also hit, leaving her with two crew dead and her Sea Cat magazine flooded and boiler room damaged – with each compartment now playing host to a very unwanted guest in the form of an unexploded bomb. Broadsword also came under attack, sustaining some damage from cannon fire, and the decision was taken that she would be of more use rejoining Coventry as “goalkeeper” for more offensive missile trap duties further away from the San Carlos area.
On 22nd May, transiting west from the carrier group to join up with Broadsword for a patrol north-west of Sedge Island, around 07:00Z (04:00 local) Coventry detected an Argentine Boeing 707 reconnaissance aircraft. Initially keeping her 909 radars off in order to lure the aircraft closer, lock was made once the aircraft had approached to 25 nautical miles distance 3. During the Sea Dart launcher loading sequence, the starboard flash door on the Sea Dart missile launcher failed to open due to damage from heavy seas and salt encrustation around a locking bolt and the starboard beam of the launcher could not be loaded. The software of the system could not complete the loading sequence as a result, and this stopped the launcher from being able to be fired 4. The locking bolt fault was a known issue – indeed HMS Glasgow was trialling an improved design on one side of her Sea Dart launcher (and would suffer an identical fault on the unmodified side). The Boeing had turned away, no doubt detecting that it had been locked onto, and by the time the launcher had been set to single firing mode, had fled out of range – having reported the deadly presence of a Type 42 on the main route into Falkland Sound. The remainder of the day was relatively quiet with Coventry directing the SHAR CAP against various targets that stayed outside Sea Dart range – and then turned tail and fled when the SHARs approached. The Argentines were clearly probing carefully to try and ascertain what British warship(s) were now guarding their main route into the area.
Later that day HMS Cardiff also attempted to down the same Boeing – they had more luck in that their missile fired successfully and was seen to explode near the target, but the aircraft’s crew had seen the missile launch and successfully manoeuvred to avoid it, diving at high speed away from the missile and returning to base safely – if somewhat more respectful of the Sea Dart’s maximum engagement envelope! This appears to have been the last occasion on which the Boeing was detected by British warships – leading to suspicion that it was damaged in this incident.

With the landings at San Carlos Water now well underway, and numerous warships having been hit, it was imperative to provide better defence against air attack, and placing Coventry and Broadsword way out to the north-west had been a means to give Coventry’s Sea Dart a clearer radar picture to operate in, and for both ships to provide longer range warning of incoming raids to the ships in San Carlos. Before the war, Coventry had been fitted with some extra listening equipment for an intended snooping mission near Soviet naval bases; this came in handy along with some Spanish-speaking interpreters, who passed on valuable intelligence overheard on the airways. This meant that the first indications of a raid were often the chatter of the aircraft shortly after they took off from their bases in Argentina.

Bomb Alley once again came under heavy attack, with much of the incoming raids avoiding the missile trap set by Coventry and Broadsword, detouring to the south-west over West Falkland. This meant Argentine aircraft were therefore arriving in Falkland Sound with little warning, but also little idea of where they were themselves. With only seconds in which to identify a target before they were themselves under attack, this degraded their ability to make a real impact on the landings, but concentrated their attention on whatever ship first showed up in their sights. HMS Antelope, another Type 21, which had only just arrived on the scene, was hit by a pair of bombs which both failed to explode (but sadly killing one member of crew), and during a defusing effort that night the first bomb exploded, causing a fire and eventual abandonment and loss of the ship. One bomb disposal engineer was killed, but the remaining crew all escaped.
On 23rd May, Coventry planned to move the patrol line even further west, but instead we were called back to the carrier group, as part of defence against a suspected Exocet effort against the group. This also involved the carrier group leaving its previous area and moving 80 miles further North. At 20:27Z (17:27 local), Coventry picked up ESM indications of what was thought to be a C-130 Hercules approaching the Falklands from the south west 1, and then assessed to be a group of up to 5 aircraft. A pair of SHARs were directed to intercept but found nothing. Postwar it became evident that there was indeed an attempt to mount an Exocet attack – the C-130 indications were from the refuelling tanker supporting a pair of Super Etendards, that had flown to the expected position of the carrier group, found nothing, and returned home 5.
We were released that evening, after refuelling, to rejoin Broadsword in our missile trap position. Admiral Woodward, however, had forcefully requested a patrol line nearer to San Carlos, so the ship’s could provide a better ‘umbrella’ for the defenders there.

On 24th May, the chosen patrol line was therefore around 10-15 miles north of the entrance to Falkland Sound, from a point near Eddystone Rock to around halfway towards Pebble Island’s Cape Tamar. At 13:42Z (10:42 local) Coventry picked up radar emissions from Argentine aircraft and directed Sea Harriers against them; none attacked the Coventry or came close enough to be taken down by Sea Dart, but Coventry’s Fighter Controller was able to position the SHAR CAP such that it could attack anything trying to sneak past. The SHARs did well, at 14:03Z (11:03 local) taking down 3 Argentine Daggers in a matter of minutes, and adding to ‘the scores on the doors’ – the Ops Room door’s increasing tally of successes. Meanwhile a section of 5 Skyhawks had managed to get in amongst the landing ships with the result that RFA Sir Galahad was hit with one unexploded bomb at 13:50Z (10:50 local). The escaping Skyhawks evaded the SHAR CAP but Coventry had a brief detection on her aft 909 radar and fired a single Sea Dart without success.
The weather had cleared up entirely, with blue skies, calm seas and unlimited visibility – not good news for us. Coventry requested permission for a patrol line further to the west for the next day, conscious that hanging around in the same spot would be likely to draw adverse attention. In the meantime, as darkness drew in, Broadsword retired to the east to refuel while we carried out an anti-submarine patrol in the approaches to Falkland Sound.
Meanwhile, back in the UK, the Ministry of Defence had helpfully informed the BBC of the many ships that had been hit by Argentine bombs that had failed to explode. The BBC had duly reported it on the 23rd – which led to some busy hours for Argentine armourers, now suddenly aware that many of their bombs were failing to go off. This was because the arming wires, attached to a small propeller in the tail unit of the bomb, were too long for the very low heights at which the pilots were releasing the bombs. The prop would not turn enough times to arm the bomb before it hit, and with modern warships being unarmoured, the bombs would often punch straight through the thin metal of the hull and out of the other side before going off (as HMS Glasgow had found), or they would wedge within the ship, having not armed before they were stopped by something solid (as with HMS Antrim, Antelope and Argonaut) . The Argentines began work on fixing the problem, trying lighter weight bombs and shorter arming wires. Coventry’s good luck was just about to run out.
References
- National Archives DEFE 48/1169 – Op Corporate Reconstruction & Analysis of the Air War
- National Archives DEFE 69/827 – Op Corporate Flight Report – HMS Coventry
- National Archives ADM 220/2477 – Analysis of Op Corporate Air Defence of the Task Force
- National Archives DEFE 69/1336 – Report of the Board of Inquiry into the loss of HMS Coventry
- Handbrake! Dassault Super Etendard Fighter-Bombers in the Falklands/Malvinas War 1982 by Mariano Sciaroni & Alejandro Amendolara, ISBN 978-1-915070-72-2
- Sea Harrier Over the Falklands by Commander ‘Sharkey’ Ward, ISBN 0 85052 305 2
- The suicide mission of Puma AE-505
- ARA Alferez Sobral hours after arrival at Puerto Deseado
- The Navy finally sank the ship that fought in the Falklands